Friday, March 27, 2009

soapmaking part two


The soap had to sit over night all wrapped up in blankets for insulation. The next day we sliced it into bars, or rolled it into balls. It still needs to sit around for several weeks to allow the excess water to evaporate, but it is good to go. We already used some and it is lovely.

soapmaking part one

I made soap! It really works! I've been reading up on this and I finally tried it. Basically you mix fat and lye and stir until it emulsifies (you better read about it before you try it-- there are lots of websites that explain how to do it. Here's one). Then I poured it into a box lined with plastic.

Saturday, March 21, 2009

gardening cake


This is actually a bunch of cupcakes. Didn't it turn out cute? It is 100% edible. The dirt is graham crackers/cocoa. The vegetables are different candies, ie laffy taffy, m+m's, star bursts, that sort of thing. The leaves are cornflakes dipped in candy. The seed packets are graham crackers dipped in white chocolate. It should taste great.

Friday, March 20, 2009

making yogurt instructions part 5


This is the finished yogurt. The very top has a few frothy air bubbles, but you can see the thick creamy yogurt just underneath that. Sometimes my yogurt is a bit thicker than this and once in a great while a bit thinner, but this is a very consistent product and is much better than store yogurt. Once your yogurt is done put it in the fridge and use it within two weeks or so. Remember to save back a spoonful to make the next batch. I'll do another post sometime about using yogurt, that's the fun part!

making yogurt instructions part 4


Once all the powdered milk is blended into the warm water stir a heaping spoonful of yogurt into the milk mixture. For some reason it isn't a good idea to use the blender to mix in the yogurt, too violent? I've tried it and for some reason gentle stirring is better. Put the pan of incubating yogurt in a warm place. I'm showing using a "cooler" with a couple of mason jars of very hot water. I'll close the lid and leave it there for eight hours and will have yogurt. The idea to to keep it warm for 8 hours, you could use the top of the water heater, a heating pad, an oven with a pilot light, anyplace where it stays consistently warm for several hours. It can stay there from 8 to 12 hours. I wouldn't leave it any longer than that.

making yogurt instructions part 3


Once the water is heated up to 110-120 degrees turn the heat off and, using a blender or food processor, blend five cups of non-instant powdered milk (or if you are using instant powdered milk, use six cups) into the warm water. Sorry about the fuzzy picture. That's what happens when you try to photograph and work at the same time. But it does show that I'm blending the powdered milk into the warm water.

making yogurt instructions part 2


Other than water there are two more ingredients-- powdered milk and active culture yogurt. I use non-instant powdered milk. I've used the instant powdered milk and it works fine also, you just need to use more of it. You'll also need some yogurt as starter, shown here is Dannon All Natural Nonfat Yogurt. I've also had very good luck with Aldi's plain yogurt. As long as it says it has active cultures and is plain yogurt (not fruity and sweet) it'll work great. You only need a heaping spoonful and if you make yogurt regularly you can save a spoonful from your old batch to make a new batch.

yogurt making instructions part 1


This is going to be a "how-to" series. How to make yogurt at home. This will make a large batch. Measure 12 cups of water into a pan. Heat it up to about 110-120 degrees.

baby plants


Tuesday, March 17, 2009

plants in the garden

I've got green stuff in the ground! That makes me happy. The Chinese cabbage and the broccoli and the regular cabbage and the peas, all of which I've been babying for weeks, they're all out in the dirt and hopefully they'll be enthusiastically growing. It feels so good to have plants in the garden (where they belongs) instead of in the house traveling from sunny window to sunny window. I'd have to say I tried to start the peas too early. We'll see if they make it ok. I'm very impressed by the chinese cabbage so far. It grows enthusiastically and as a person who loves to cook Chinese food this could be a new permanent addition to my gardening.

Monday, March 16, 2009

yarns


The light hank is 100% cotton. I always thought cotton would be really hard to spin. It's not. It's definitely more slippery than wool, but it isn't like I couldn't spin it. I haven't knit it up into anything yet, maybe a summer top? The medium is a coopsworth wool. EASY to spin. It is a bit scratchier than I'd like, but it was a joy to spin. Because it isn't super soft I'll probably use it for a blanket or something like that. I was a bit disappointed when it arrived in the mail, I ordered it thinking it would be more of a garment type of wool. Live and learn.

Sunday, March 15, 2009

new garden beds


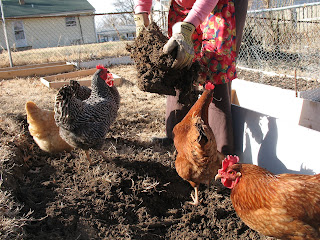
I was digging new garden beds and the chickens figured out pretty quickly that the spade was opening up new pathways to worms. It felt like "party in the garden."

Saturday, March 14, 2009

dishrag

I've never liked dishrags, they are too big. I've always liked more sponge-size cleaning aids. At the same time I hate the sour/nasty/bacterial build-up inevitable in a sponge. I was looking at a website (down---to---earth.blogspot.com) and she was knitting (idiot easy!) cotton dishrags. They reminded me of my grandfather knitting the exact same type of dishrags after his stroke, in order to get control of his hands. So I was thinking how nice it would be to make my own dishrags and DUH it occurred to me to make them smaller. I LOVE THEM! I have a pile of them and can either throw them in the wash after use or hang them up to dry. AND they are 100% cotton so they'll just get thrown in the compost eventually. They are garter stitch, so it is a very bumpy surface for scrubbing. They work really really good.

Directions for making dishrags.
Get some 100% cotton yarn (Cotton and Cream is at Walmart, and it's cheap and it works perfectly). Using a set of #8 knitting needles (or #7 or #9), cast on one. Turn. Knit in the front and back of that stitch. Turn. Knit one, knit in the front and back of the next stitch, knit to the end of the row. Turn. Continue to K1, K in fr and back, k to end until it is as big as you want, I knit to approximately 3 inches (which for me was 20 stitches). Once it is as big as you want it to be start the decreasing, as follows- Knit one, knit two together, knit to the end of the row. Continue doing this until you only have one stitch left, then bind off. You're DONE! This is definately beginner's knitting, they churn out really fast.

Friday, March 13, 2009

warm box


I love low tech solutions to ongoing problems. For years I have used a heating pad for a place to set raising bread or incubating yogurt. The heating pads they now sell have an automatic off switch, so they just don't work that great as a warming pad for food. Here's a new solution-- a warming box, otherwise known as a cooler. A cooler is just an insulated box. If it has cold stuff in it it'll keep it cool; if it has warm stuff in it.... The pictures show a pot full of bread dough and a mason jar of very warm water. I put it in the bread dough and the hot water in the cooler, shut the lid and I've got the perfect warm spot for raising dough. I've also used this set up for making yogurt, it works perfectly.

Thursday, March 12, 2009

angora


I love to knit. I adore knitting with soft yarns. These are both made of angora, which is bunny fur. I spun the yarn for both of these projects. DD#3 wanted fingerless gloves. They seriously look like bear paws with claws. They are so soft and yummy to wear. The intricate cable is going to be a blanket, or a shawl, or something like that. It is a complicated pattern I've wanted to do for years and I think it is really interesting looking.

Wednesday, March 11, 2009

potatoes and sweet potatoes


The sweet potatoes in the moist dirt are supposed to be starting to grow slips. This takes quite a while to get going and all the time I can't tell if it is working or not. BUT it all worked last year, so I'm hoping it will work this year! Eventually there will be green leaves just tumbling out of that plastic bucket. The potatoes are also "chitting" (I think it is the word). I'm trying to grow out some eyes before I plant them. By letting the eyes grow a bit (supposedly) you get a jump on the season.

rhubarb and strawberries


The rhubarb is poking up through the dirt. This is it's second year and we get to harvest some this year. YEAH! When I was a kid I thought rhubarb was free food. Both my grandparents lived in a rural community and people would willingly hand us rhubarb every spring. We took it willingly. (They were even more generous during zucchini season, but we weren't near so willing.) The strawberries aren't really doing anything yet, but they've obviously survived the winter.

Tuesday, March 10, 2009

wedding dress


DD#3 No she's not getting married. She's in a play and needed a wedding dress for her costume. We were out visiting thrift stores and found this at the third store we went to. I think it is lovely.

Sunday, March 8, 2009

new compost bin


This is my new compost bin, not a concentration camp. A friend (thanks M~!) gave us a van load full of cinderblocks. Our wire compost bin was overflowing and I was thrilled to take the blocks off her hands. As you can see the chickens made themselves right at home. Eventually I will have three bins, the plastic bags are where the second bin, the dry materials bin, will be. The eventual goal is to have three bins. One active bin, one storage materials bin and one bin of finished compost. These three bins are rotated as needed (ie I throw compost into the first bin for an entire year then ignore it until it turns into compost, while I start a new active pile in another bin).

Friday, March 6, 2009

You can comment

OK, You can now comment on this blog easily. I'm really not very tech savvy and several people have told me they can't figure out how to make comments. I just needed to go and change some settings and now it should be easy (easier). THANKS for actually looking at the blog!

baby garden part 2


And this is what my garden looks like right now. Pretty dismal, huh? New compost is coming ASAP. We went to get compost yesterday. BTW we are very blessed. We live a few miles away from compost heaven. They make mountains and mountains of it. We can see the mountains from the highway, steaming all winter. It is a kind of surreal scene. They mainly sell to lawn companies buying semi- truck loads, but they're very good about selling to private individuals. You can either bring your little truck and have them use their bobcat to fill it or you can bring your shovel and plastic bags and scoop it up. It's good quality stuff and TONS cheaper than what they sell in the garden stores. ANYWAYS, we take out the seats from our minivan and load it full of plastic bags of compost. We get home and unload the plastic bags into the driveway. I say, "I'm tired, I'll take care of filling the garden squares with compost later." It wasn't a full hour before we got a citation from the local government to get all those bags of garbage out of our driveway. Sheesh! Were they waiting for us to come home? It was pretty funny. But I am more than willing to comply with my county govenment's request and dump all those bags of compost into my garden. I just wanted to lay down for a hour or two first!

baby garden


Here's my baby plants. Or maybe I should say 'here are my plants I'm babying along.' I have several trays that are under grow lights/in a sunny window (if the weather is cold outside) or (if the weather is gorgeous, like today) sitting in the sun out on my lawn. I've really struggled with starting plants from seeds. It has taken me years to get to the point where I feel like I have any idea what I'm doing. Like Thomas Jefferson said, "I'm a very old man but a very young gardener." You can see the plants are in either toilet paper tubes or in rolls of newspaper. I like to have them separated into individual plants. When they get too big for their britches I put them in a bigger pot.